Wednesday, March 30, 2011

SUPER Lucky Duck

Yeah.

That's right.


2 MORE TIMES!

That's 4 giveaways in under 10 days... Crazy!

I just got 2 emails from Skye at Neathering our Fest.  She had 2 giveaways for her blogiversary and I had won both!  


By the way, she has the cutest blog!  I love the name and the story behind it.  Read it here. :)

The first win was for 2 samples of Basic H2 {A Shaklee cleaning product} and there were 5 winners.
I actually won 3 of the 5! {So technically I just won 4 more times, but it's just 2 things}.  So I won 6 samples of that. I've actually won a sample before from another blog awhile back and so I've used this product.  It works great, it's safe, non-toxic, no fumes, and it's all around good for the environment, kiddos, and cleaning!  It's some great stuff.

And then her other contest was for some super cute pantry decals from Wonderfully Wordy.  Here's of pic of them! {not pictured but included is powdered sugar}
 I can't wait to use these in my pantry and cupboards!


Thank you Skye!!!

Monday, March 28, 2011

Lucky Duck

My goodness gracious.

I am a lucky girl.

Serious.

I just won 2 giveaways in 1 week!

Wooo-hooo!  

I'm still a little bit in shock.

Last Tuesday I won some Eye Candy from Happy-Go-Lucky.  

Kara is super sweet and has such a cute blog.  We've emailed some, so were pretty much bloggy BFFs.
Aaaaaaand I already recieved my prize it in the mail.  

Sa-weet!

I love my Eye Candy, they are so nice especially after a busy/stressful day.
Wondering what Eye Candy is???

Here is a pic of what it is from their website.
Fun huh?!

And just NOW I found out I won a $20 credit to {Just.Lovely.Things.} from....


wait for it....


Have you heard of her?  Her blog is amazing and everyone should stalk follow her.  

I big puffy heart her blog.

She has so many followers and entries in her giveaways that I never dreamed I'd win.

And the shop I won the credit to, {Just.Lovely.Things.}, is Ah-mazing.  They have the cutest headbands.  Go look if you don't believe me.
Here are some of things I'm thinking about getting with my credit.


Agghhh! I can't decide!
What do you like?

And that's why I'm a lucky duck!

:)

Thanks Kara and Ashley for being such FaBuLOuS Girls and for hosting the giveaways.  You guys are awesome.  
For reals.


Sunday, March 27, 2011

Interchangeable Wreath {Tutorial}

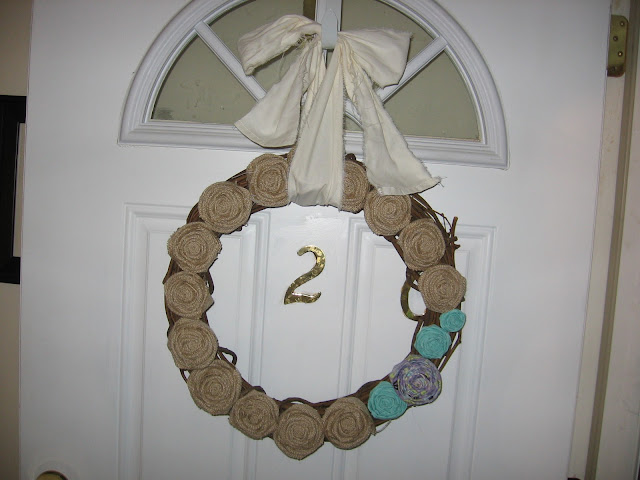
The other night my hubby was gone most of the night so after the munchkin was in bed I got my craft on!  I started working on a wreath a little bit ago.  But not any old themed wreath.  I wanted it to be interchangeable!

First, I used a grapevine wreath that I got from Goodwill for a $1.  I just had to pick off all the ugly fake flowers and bam, I had a super cheap wreath.  They cost a few bucks more at craft stores.


Then I used some scrap burlap I already had and began making rosettes.  I did this until most of the wreath was covered.  I purposefully left an open space, the size of 3 of my burlap rosettes, for the interchangeableness to happen! 


And I did actually make 3 more burlap rosettes to fit in that space for when I wanted a simple but cute generic wreath.

So with those rosettes, I placed them on the wreath and figured out where the wreath parts stood up the most and placed the {hard} velcro accordingly.  {I used hard just because I less of it and a lot more soft that I could make options with to stick on the wreath.}
 And then I matched the velcro on the wreath to the rosettes and put the soft velcro on them. 
 Placed them on the wreath and...

... there you go!

Now I have a kinda big gap, but don't worry.  That's where I was going to put the bow to hang to the wreath.  I got some scraps, which was actually an old valance I was going to donate then decided to keep for repurposing- score!  Cut a couple inches the width I wanted and then ripped the rest of the way for a frayed look.

Then I just tied it in a bow onto my wreath!

I love it already!

But I wasn't done yet... now to make some more rosettes to switch out when I felt like it. I did a couple options and the hardest part was deciding which ones to use on my wreath!


Options 1 and 2


And I went with...


Option #1!   
{for now}

I love the touch of spring the colored rosettes add.  It's simple and not crazy busy or overwhelming.

Yay for spring!


I'm SO DONE with Winter.


{Linking to these parties.}

Friday, March 25, 2011

7 Months

This little boy is 7 months old!
He is so sweet.  He melts my heart every day. 

I just love him to pieces.

He has this bin of toys in our TV room.  When we give him some of the toys in it he just goes for the bin.  He loves it.  He'd rather play with that than any of toys in it most of time.  It's pretty funny. 

Also when we give him a larger toy, he'll grab it,  turn it over, and bang his hands on it over and over.  He just keeps turning them and banging on them.  Funny little guy.  
Playing with Daddy.  Gray just loves his Daddy!


Sleeping so sweetly with his Mickey from Nana.

We got to visit Nana and Grandpa {my parents} for a week a couple weeks ago.  We had a blast.  Nana loved her Grayson time.  And I loved getting some extra sleep in the morning!

Gray had his first fruit while we were there.  He had apples and loved them!  He also loved that he could sit up in the bouncer at Nana's.

 Playing with Aunt Angelyn

When the little guy was in bed, I got to play games with my family.  So fun!  This is us {my sisters and Erin, who's like our sis} playing President {some people call it Scum} one night. 

Gray loves him some bath time.  He splashes and splashes and has a grand time in the tub.

I feel so blessed every day to be this little guy's momma.  

He is quite an active boy.  He loves to move and go and wiggle and stretch and squirm and twist.  
He is just always on the GO!

I think I'm going to have my hands full when he starts crawling.  

On the note of crawling, I thought he was on the verge of crawling last month, but he's still not quite there.  He doesn't go backwards anymore though.  He can go forwards a little at a time, but not by crawling.  He gets in position, scoots both knees forwards at the same time, and then falls on his stomach.  Then he does that again and makes small progress going forwards.  

Here's a video  where you can see it a little bit.

He's also a happy screamer.  He can scream quite loud too.  He LOVES to go visit his cousins Jackson and Drew next door.  He loves to watch them and any other kids too.  He is always smiling when he see's other babies or small kids.  There's a cute girl at church who likes to come up to him and take his pacifer.  He doesn't mind.  He just smiles at her.  I think he's a people person. :)

Grayson loves to watch Baby Einstein.  We have a few of the DVDs and he watches when I take my shower in the morning or when he's super fussy and I can't figure anything else to make him happy.  He loves Baby Einstein.  It makes him happy and calm without fail.  He also screams in delight during the movies, most especially when certain puppets come on the screen.  It's so cute!

Here's a video of him watching a Baby Einstein {with some cute happy squeals}.


I love my little Gray!

Wednesday, March 16, 2011

No-Reply Comment

Did you know that if you leave me a comment that I can {and do!} reply back to it?  If so, then you have the nice little box checked in your blog profile.  If not, then you are a no-reply comment blogger.  I have my comments set to be sent automatically to email.  That way, I can read all my comments and reply to them at the same time.  I love it!  Also, if you ask me a question, I can answer it.

Don't worry if you are a  no-reply comment blogger.  It is a quick and easy fix.  I promise!    I was a no-reply comment blogger too until a couple months ago.  And I didn't even know until I read a post like this on another blog.  I love reading replies from other bloggers when I comment and I LOVE replying to your comments.  Anyways, so go here and she has step-by-step instructions with screen shots to show you how to do it.  Super easy!  Comment and tell me if you do this.  {And you can bet I'll reply to you!}

{Grace, Emily, Brienne, Amber... you girls are a few of my friends off the top of my head who always leave me nice comments that I can't reply back to, but I would love it if I could!}


Also, if you're a blogger and you want to receive the comments that people leave on your blog in your email box {they will still show up on your post}, here's how to do that.

Go to Dashboard
Go to "Settings"
Go to "Comments"
Scroll to the bottom of the page. See where it says "Comment Notification Email"?
Put in the email address that you want your comments to go to.
Be sure to save your settings after you change it.
Did this help anyone?

Thursday, March 10, 2011

Coffee Table Makeover

So I've been super interested in the furniture makeovers I've been reading about lately in blogland.  I've been looking at them for awhile.  I LOVE reading them and seeing the before and afters.  I marvel at how beautiful these pieces look after some work and love when they start out looking so plain and/or ugly.  I've been dying to do it myself and finally had the courage to do it!   

To start I emailed one of my bloggy bffs, Amy, to ask her for some tips.  She did this amazing dresser makeover that I {still} drool over and other painting projects, so she knows her stuff!  Anyways, so after her tips, I began.  I wanted to paint these end tables that are in my living room. 

I don't  have a before... I'm so bad at that!  {I just get so excited to dive in.}  But look at the color on the bottom side of the table in the 2nd picture.  That's what the tables looked like.  Not bad, but plain and boring wood color.  We have wood floors, wood coffee table, and these {fake} wood end tables.  We can't paint the walls 'cause we're renting, but I can paint our furniture!  And boy am I gonna.  I have big plans for pretty much every piece of furniture we own, haha.
So I cleaned them off, {forgot to sand, whoops}, and gave them a couple coats of white {mistake #1} spray primer.  Sanding isn't completely necessary if you prime, but it helps. 

Then I began painting.  I chose what I thought was nice red color. Yeah. Thought. 

It turned out more of a pinkish, watermelon-like color.  Not the red I wanted.  See that corner of the table in the picture above where it's darker?  That's where I tried another layer to see if it looked any better.  Nope. 

Now what?  I was frustrated.  Then in the back of my mind I somehow had the thought that maybe I was supposed to use a different color primer if you paint with red.  Turns out that's correct.  I read about it online and asked a few people and my SIL Jennilyn told me they had to use red-tinted primer when they painted their walls red.  So off to Lowe's I went and asked the paint guy for some red-tinted primer.  He looked at me funny like it was odd request.  So I explained what had happened and he told me to used gray primer if I was painting with red.  So I got some and began to prime.  But this time, I decided I wanted to paint my coffee table, not the end tables.  I put the tables aside to re-prime later and began on this coffee table. 

I actually remembered to sand this time, woo-hoo!  And got my hubby to help, double woo-hoo!


Then we began to prime.


Here's the table all primed and ready.  And yes, the top lifts up, which we love!  It's super handy if we want eat there and watch tv at the same time.  Which we actually don't do much anymore since we moved the tv, but I still love that coffee table.  Plus the top lifting off was great for painting it.  Winning! {Charlie Sheen interview anyone?  I actually saw the SNL version first, too funny}


The first coat of paint.  Still looking pinkish to me...

Unfortunately, I have bad remembering-to-take-pictures skills, and don't have any of the table with more layers.  But basically, it still looked too pink for me after about 4-5 coats.  {mistake #2- wrong color of paint} So again, super frustrated.  I wasn't going to give up though!  This was my first ever furniture painting experience.  I was making lots of mistakes, but I was learning.  So I kept going.  I didn't want to give up.  I went back to Lowe's and got some Classic Red paint by Valspar in semigloss.  I figured Classic Red was a good choice to make sure this table looked RED this time!

So I painted right on top of the pinkish red {the Lowe's guy said that was fine} and this time I loved the color.  It was perfect.  I was so glad I didn't settle for the pink/red, like I was debating.  This was what I wanted. 

I wanted to glaze the table as well.  I love the way glazing looks on the furniture makeovers I've seen.  I did it {mistake #3} and didn't love it.  So I painted over it.  The glazing still showed through a little bit.  But I liked it then.  It wasn't so dark.  I think maybe this coffee table wasn't a good candidate for it.  I'm not giving up on glazing yet. 

Last step, was a finishing coat.  After all that work I wanted my table to withstand time and kids and moves.  I had some spray paint clear top coat stuff.  Mistake #524 {or so it felt}.  It looked uneven and just not very nice.  Now how I wanted my table to look.  So I went to a pro.  The talented gal of Maple and Magnolia {who does lots and lots of furniture makeovers} recommended this to me and it was super easy to use.  Which was nice after the long process of priming, painting, glazing, and painting.  You literally just wipe it on.  It only took a few mintues to cover the whole thing.  Then I let it dry and did a second coat.

Now it is done!


It took 2 weeks from start to finish.
And it felt like FOREVER.
I do feel that I learned a lot.  And the next time it won't take me nearly so long {knock on wood}.  I still need to finish those end tables!

A final before and after.

I love it!


Linking to these parties