
Here is my pinspiration-

Pretty darn cute, no?
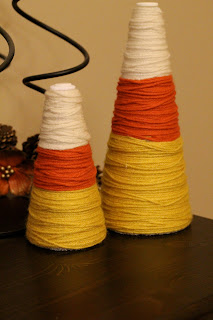
Aaaannnnddd, here are mine!

Yay, I love them. They make me happy when I look at them. And they were surprisingly fast {and easy} to make. I mean, I knew they'd be easy, but double bonus for being fast too!
Wanna see how I made them? Well, ok, if you insist. I'll do a lil' tutorial for ya! The picture I pinned didn't link back to a blog or site or anything, so this is just the way I made up to do them.
1. Get your supplies- foam cones, orange, yellow, and white yarn, and a hot glue gun {not pictured}. I got the thick, soft yarn because I liked that is was thicker and it looked prettier {in my opinion}. But any kind will work fine. And those cones were actually bought a year ago for a Halloween project I never did. I'm sad to say I have a quite a few supplies like that. It worked out this time though!

And if one of your cones breaks, don't worry! Just hot glue it back together, easy peasy.


{I just love the pretty colors and soft yarn}

2. Get your first color- yellow and tie it around near the bottom of the cone. You don't want to go right at the bottom because then it can slide off easily.

3. Snip off the extra piece of yarn from tying your knot.

4. Start wrapping the yarn around your cone over and over. It doesn't have to perfect! In fact, myself the perfectionist, loved the look of yarn wrapped all different directions. Plus guess what?! It's much faster that way too. ;)

5. Just keep going and wrapping the yarn around and around and up and down until it's the height and look you want. Cut the yarn and glue the end down with a teeny dab of hot glue.

**Also very important, make sure you have a super helper to unwrap all the yarn for you. ;)


One more tip for you, make sure you start out with the correct color. Save yourself some unraveling and look at a candy corn first to see the color order. I mean, not that I would know from experience or anything...

6. Now start again with orange!


Here's a picture where you can see how I glued down the end of the orange yarn. I know it looks ugly, but you will cover it up with the next color.

7. Lookin' good, almost there! White is the last one.


8. To finish it off, you need to use more hot glue. I continued to wrap up and over the top using lots of small dabs of hot glue. Be careful! You can't cover up mistakes too well on the top. Just go slowly and spiral the yarn until you get to the center. And use small amounts of hot glue so it doesn't seep up and on top of the yarn. Then you'll see it and it won't look as pretty.


Finished!

Then make another one if you want.

And admire them.

And have your helper do some tests to make sure they are in proper order.


You likey?


I do. :)

Some of you super clever peoples may have noticed a small difference from the picture I pinned and mine.
No? See it now?
The other one finished the top with a white button. While it was cute, I wanted to keep an all yarn look. The button would have been a little easier, but I like mine better. :)
Have you been inspired by Pinterest lately?
I'll be linking so some of these parties.
And to- Home Stories A to Z

42 comments:
Love these! I am inspired and I think I will have to make them :)
PS. Where did you get your foam cones?
Oooooh, this is so adorable!!! I love it! I have a love/hate relationship with yarn wrapping...ha ha, but I'm glad to hear that this project is a quick and easy one :)
Super cute! Great job! :)
LOVE these! I'm not usually a "fall" decorator but I REALLY want to start and I think this is just the project to start with! Thanks for sharing. :0)
This seems really easy/awesome/fun! Thanks so much for sharing! I might have to try this :)
I love it! It really does look easy! I might even try to make them myself. Where did you get the styrofoam things? Are glue guns expensive? The fact that I have to ask you these things goes to show you how little I do crafts!lol
They are wonderful, I may make some myself. They remind me of some Beehives I made a couple of years ago.
Thanks so much for a great tutorial. I pinned it so I can come back later! :)
I love it! I pinned them!
That is so funny, I just made these from the same inspiration. :) I have posted it yet though. I think yours turned out great! Aren't they fun??
So cute! I will have to try this. Stopping by from Not Just a Housewife's linky party.
SWEET! Love these..thanks for sharing! Pop Art Minis
So cool, crafty and something that I think I can do!! Thanks for sharing it. I saw your link on Home Stories from A to Z. Renea.
I love that you were pinspired, I have these pinned as well and I was planning on making them. Now, you saved me the hassle of figuring out how, thanks Jenna! I love them, they are super cute!
I'm constantly pinspired! I love it! Way to go for following thru... I always pin and then never find the time to do all the great projects. These seem quick and easy enough tho! Great job!
These are so cute!! I was just pinning candy corn crafts this morning. I'll have to add this to it! Thanks so much for linking up to The Creative Spark. Have a fabulous week!!
Jenn :)
I like it without the button as well. Thanks for linking to Wicked Awesome Wednesday!
LOVE this! I was born on halloween, so this is my favorite time of year :) Need to try this!
ME LIKEY!!
This is so cute and easy! I will have to try it out soon!
So Cute! I might have to make some myself!
These are so cute! I am going to have to make them!! Love how they came out, I pinned them too!
Michelle
www.delicateconstruction.blogspot.com
Really dang darling and the kids can't break 'em! Come be inspired by a courageous man.
So perfect for this time of year! I've been looking for a final touch to add to my Fall table and just might have to make these. Your little helper is pertty stinkin' adorable, too. ;) Thanks for sharing!
Kim @ Little Rays of Sunshine
morrowsunshine.blogspot.com
These turned out so cute. Your little helper is adorable too. Thanks for linking to the Home Decor and Organizing Link Party. I'm featuring your project on my fb fan page today. Grab a featured button if you'd like.
love this idea! so darling and it doesn't look too hard which is my kinda craft. take care! I'm a new follower.
kathryn @
www.thedragonsfairytail.blogspot.com
Looks a lot easier than those yarn wrapped wreaths! I definitely think that I could do this! Very cute!
I love love this, Sooo cute & creative:)) I found ya per blog hop and had to stop in and say hello, officially following ya..Hope u can stop in and say hi sometime..(I have a linky fall blog party that this will fit right into if you don't mind linking..:))..I'm Marilyn via http://theartsygirlconnection.blogspot.com/2011/09/fall-crawl-day-5-blog-party.html ..happy weekend..
I have a friend who would love these....In fact she might even try to eat them. :)
They are great!
Karin
www.artisbeauty.net
These are DARLING! I just might have to try my hand with yarn-wrapping. I'm going to go pin this right now! I'd love it if you would come link up to our Halloween link party!
http://lifeinthemotherhood.blogspot.com/2011/09/great-halloween-link-up.html
I LOVE pinterest... it's so addicting!! My son loves to "help" when I am doing yarn crafts too!!:)
Love these candy corns! I shared this on my crafty facebook page : )
Jaimee @ craft-interrupted.blogspot.com
I'm planning a Candy Corn Post for October, would you mind if I used one picture and linked back to your page? I would love to include this grate idea. Thanks!
Love! I'd love for you to link up to my Wickedly Creative Halloween Ideas Link Party!
www.itsybitsypaperblog.com
I totally want to make some of these! They are so cute and easy!
These are too fun! And kiddo safe is always a plus!! Following you on Pinterest now by the way! ;) Thanks for sharing on Fancy This Fridays!!!
So cute! We're featuring candy corn crafts on our blog this week, and I'll be sure to include yours. Thank you for sharing your inspiration! Sharon, www.craftsncoffee.wordpress.com.
I love these Jenna! So clever! Thanks so much for linking up to Try it Tuesday! You rock!
Have a great day!
Tasha
OH MY GOODNESS!!! How stinkin' cute is this??? LOOOOVE IT!! You are so crafty! first time visitor :)
So cute!! I may have burned my fingers on the top of mine. ;)
Featuring your awesome idea on my blog today! Feel free to check it out!
http://anisfavoritethings.blogspot.com/2011/10/candy-corn-crazy-and-few-other-fall.html
Thanks for such a great idea!
You were featured today at Blissful and Domestic today! Stop by and grab a button:>
www.blissfulanddomestic.blogspot.com
Post a Comment